Tuesday, December 15, 2009

12 weeks of Christmas - Week 12

Wow week 12 is here already. Since we are down to one full week plus a couple days until Christmas I am sure many are now just grabbing gift cards. I know I grabbed a couple! But wouldn't it be fun to give a gift card in a little more then an envelope? So this week we are going to do a couple gift card holders. And as a bonus I will throw in a way to dress up some concert or sporting event tickets!


I love the explosion boxes with a pocket for a gift card. 
Denise at Paper Pastime has a great video tutorial for making one with one or more pockets for gift cards I love that she added a 3D element right in the center! So I took that concept and combined it with the explosion bow with a paper bow tutorial from Christmas With The Cricut and combined the two to make this:


I took this basic idea and tweaked the measurements and made a similar box to hold some hockey tickets. The measurements are different but the box it's self goes together the same way...


Ignore the football tickets. I wanted to see what it looked like with tickets and the hockey tickets haven't arrived yet. ;)


For the box:
1- 8x12 piece cardstock
Score at 3" on each side.
Cut and remove the square from each corner.
Fold on the scored lines inward on each side.

The Lid:
1- 4 1/8x8 1/8 piece of cardstock
Score at 1" on all sides
Cut a triangle from each corner making a tab attached to the long sides.
Fold scored edges inward.
Glue tabs to inside of short sides. 

(Click on the pictures to see the cut diagrams larger)


Pocket for the tickets:
1 - 3 1/4x3 cardstock
Score at 1 1/2" down the longer sides
Fold both sides inward.

Using one of the triangles cut from the lid.
Score 2 sides at 1/16" and cut of the little square the score lines make.
Attach one side of triangle to the bottom of the box and the other to the backside of the pocket.


The Bow:
1- 4 1/2" circle from BT paper
Cut 8 curved lines from 1/4" away from the center outward to the edge.
Punch a hole in the center.
Put brad through the hole.
Fold the pointer corners inward attaching them to the brad, making a pinwheel.
Fold open the brad to hold the bows shape.

Band:
1 1/2"x12" strip of BT paper.
Wrap around box & lid.
Over lap edges and glue down (I used a glue dot)
Attach the bow with 3D foam dot. 


Some other fabulous gift card holders can be found all over the net. Some of my favorites are:
The cupcake from The Stamp Goddess - I love this project! Gorgeous presentation for a gift card!
Holiday House from The Paper Monkey
A Beanie from Caorolina's Creative Pad
Pop Up holder from Chic 'n Scratch


Monday, December 7, 2009

12 weeks of Christmas - Week 11

Because I love all things funky and fun. I decided to make my kids, nieces and nephews some fun and funky gifts this year. All you need is a sewing matching, some scissors, and some empty and clean juice pouches. And you can make some really cool gifts. I have had a lot of fun making these. And it's nice to know we are reusing something that would otherwise take up space in our landfill. I love when I can find a project to upcycle something!!

Wallets -  These are for all the kids. I think we are putting a gift card to an ice cream shop or a couple bucks in each one. I found these over at Mojo But I attached the pockets to one juice pouch first. Then I stitched the outer pouch on three sides. That way there was a pocket for money like in a regular wallet. The velcro I used comes on strips with adhesive on the back.


I wanted something to hold change as well so I used the tutorial I found at Craft Bits to make a little change purse. I made the flap edge rounded, I thought it looked cleaner that way. Again I used velcro dots for the closure.


I also made my daughter a purse. It is a little more technical then the change purse and the wallet. But it was too cute not to pass up making. I found the tutorial for the purse at Mormon Chic


If those aren't enough for you, you could also make a belt, lunch sack, checkbook covers, or a back pack. It's nice that these projects are so simple and you can easily add your own touch to all of the projects. You could add pockets, accessories, make a gift set. etc.

Wednesday, December 2, 2009

12 weeks of Christmas - Week 10

My daughter is nearly 8 and loves anything "cool". So she saw these and begged me for them. Turns out they are actually pretty popular. And super easy to make! She doesn't know it yet, but she will have a few sets of these in her stocking. :) Fleece Sleeves! They are so cute, comfy, and even a little edgy. You can use plain fabrics and embellish them or you could use busy prints. I found great instructions for these at Riotflower's Realm . I made mine a tad different. I wanted a blanket stitch rather then a folded seam. It didn't make them feel as heavy or bulky at the openings this way.


Tuesday, November 24, 2009

12 weeks of Christmas - Week 9

Week 9? Already?! Wow! This weeks gift able craft is actually a twofer! I figured I would make sure you had a little time to get this set done. How about a Chef's Hat and an Apron!  I love that both came in a size for kids and adults. The hat was an even more exciting find because it actually comes in 4 sizes, adult, child, toddler, and baby. Plus, you use velcro on the back because they become adjustable. The apron is simple enough, I figured I could come up with a toddler sized one on my own. I am making 2 children's sets, a toddler set, and one adult set. So I can honestly say I am not finished with mine yet. But these have been fun to work on! 

By the way, when you get the hat instructions there are two separate files. One is the cut guide and the other is the step by step instructions. 

I hope this knocks another person or two off of your list!

I am having computer issues at the moment. So I will try to get the pictures up ASAP. But until then here are the ones from the tutorials...


Wednesday, November 18, 2009

Memoboard Tutorial

I was asked to be a guest designer at The Crafting Pot. I put together a tutorial for a memo board. You can use it as a bonus giftable craft if you'd like. I hope you enjoy the tutorial and The Crafting pot. It's a fabulous crafting blog!!

Tuesday, November 17, 2009

12 weeks of Christmas - Week 8

 This is a gift you can easily do for the whole family. With three little ones in the house buying PJs can get expensive. So why not make your own? I found this great tutorial Instructables for making pajama pants. And making a set is simple, get a plain t-shirt and use part of your fabric scraps to make an appliqué. You could make these out of flannel for a warm and cozy pair of pans. Cotton for those warm nights. Or even fleece for those chilly nights.

So far these are the only completed pair. But I have a stack already cut for all three of the kids.


I hope this is something you can do for your family! Happy sewing!

Tuesday, November 10, 2009

12 weeks of Christmas - Week 7

This week's project is Chipboard albums. These were made from coasters. There are very simple instructions at Craft With Me... If you don't have chipboard you can cheat and recycle boxes, cereal boxes would work perfect!

For some fun accessories you can make shrinkiy dinks. I stamped mine. But you can also run them through the printer. It would be a cute way to personalize your album.

Also rather then using a key chain like suggested in the link. I used binder clip rings. They make it much easier to assemble and to add more pages later if you choose.


Tuesday, November 3, 2009

12 weeks of Christmas - Week 6

I found a great tutorial for a soothing eye mask. They are easy to make. Low cost. And adorable! The tutorial calls rice to fill the mask. But I went with flaxseed. I also used a satin fabric to match a set I am working on. If you want to add an even more soothing touch, add some lavendar buds or lavendar essential oil to the rice/flaxseed before filling the mask.

Just a quick tip if you are going to store this in the freezer, be sure to keep it in a zip lock storage bag.


Tuesday, October 27, 2009

12 weeks of Christmas - Week 5

Remember that scrap denim I told you to hold onto a couple weeks ago? Well today we are going to break it out and make something super cute, Holiday Hanging Stars. These stars are perfect for decorations and gift giving. The pocket can be filled with flowers or other decorative items. Or you can fill the pocket with items for gift giving. These little guys are so cute you will be so glad that you made them! Like always I didn't follow the given instructions to a T. I do not embroider, so instead I stitched on a few buttons, ribbon, and a little heart clip. I backed it in this swirly print fabric. This is definitely something you can decorate for men, women, and children. Have fun making these adorable stars!


Tuesday, October 20, 2009

Return Envelope Challenge


The Crafting Pot has a challenge to use those return envelopes from the bills we pay online. So I decided to use mine in a Christmas morning layout of my kids. The envelope is addressed to Santa. My daughter filled it out herself. I thought it would be a cute way to preserve her writing. I had two extra pictures and still needed a spot for journaling. So I made a 6x6 page that will go in between the two 12x12 pages. I have no idea where my 6x6 page protectors are though. Isn't that how it goes? I used the picture of the kids as a pocket to slide the picture of the kids tree into. I also used the sanding technique to make my title. And I used pop dots on all the packages to give the pages a little dimension. All the papers and inks are CTMH ;) Thanks for looking!


12 Weeks of Cristmas - Week 4

I have 2 little girls. And what little girl doesn't like to play Dress Up? I know my kids love to pretend. So, how about an easy NO SEW project for the little girls in your life? A Tutu! I followed this tutorial from JCGrace Girls. It is very easy to follow. And you can be as creative as you wish. If you want to go all out, she also has a fabulous tutorial on fairy wings!

Here are the tutus that I made my girls for Halloween costumes. My oldest has requested another one for Christmas. She wants bright colors and skulls LOL Luckily she just asked for it this weekend, which means I still might find skull ribbon for it.


Tuesday, October 13, 2009

12 Weeks of Christmas - Week 3

This one was so fun to make. And you can do so many things to personalize it! We are going to upcycle a pair of jeans into a cute apron. And for those crafting on a budget you can get 2 aprons out of one pair of jeans! Here is a simple tutorial from Cut Out + Keep Now for mine I added a panel of fabric across the bottom and made my ties look like a belt run through the belt loops.


With this one I also made a matching birthday card and bandanna. It was a gift for my little sister.

Save your scrap pieces for denim (legs) We will need them for a future project!!

Saturday, October 10, 2009

Devil's Food

Since my baby girls is going as Angel Food Cake fr Halloween I thought it would be fin to make her older sister a costume along the same lines. So my oldest will be going as Devil's Food Cake. She will have a black and red tutu that isn't quite finished yet. But I just finished the shirt and was dying to share :)


Friday, October 9, 2009

Angel Food Cake

My 9 month old will be Angel Food Cake for Halloween. Well my take on that anyway. I made a no sew tutu and made appliqués for her top. I am pleased with how it turned out. I may do a little more to it by adding sparkles and such. But as of now this is her costume.


Thursday, October 8, 2009

Monster Mash

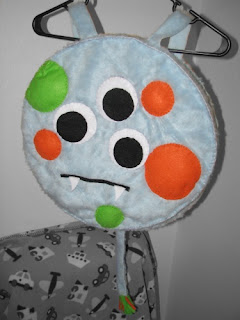
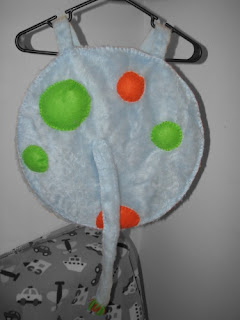
After seeing all the cute monster softies all over the net, my 3 yr old asked if he could be a monster  softie for Halloween. Of course I obliged, how often do crafty mom's get such a request? I dug through my fabric stash and found that I still had blue fur from last years costume (a flying monkey from the wizard of oz ;) ) It as as if it were meant to be! I also have a ton of felt on hand from making his baby sister Felt Food. He picked the colors for the dots himself. Then I decided they would look cuter if they were 3D. So, each polka dot if stuffed with a little batting. Since he is so active i wanted to do something that he could easily put on and take off. So I went with a sandwich board costume. Very simple not may parts, nothing to untie, zip, etc. I think it turned out great. And after seeing his face when I finished I think he is completely ecstatic. Here are pics of the costume and his treat bag. I had planned on making his bag, but when he saw this in the dollar bins at target he had to have it. Which meant less sewing for me. :) Pics of him in it to come later.....


Wednesday, October 7, 2009