I know I have been MIA with the tutorials. Sorry about that. My husband has been working out of town a lot more. Leaving me with three munchkins to entertain more. So, my spare time has been spread really thin. Now we're on summer break and I need activities to help curb the summer boredom. I am sure many of you are facing the same issue. Hopefully this is something that can keep the kiddos busy for a while. My 9 yr old really likes this project. She is requesting more tape. lol
Ducktape Rose Pens
Supplies:
Ducktape on the roll or sheet, I prefer two or more colors/patterns
A ruler (if you are using a roll)
Scissors
Pen
Start by cutting your ducktape into 2x2 inch squares, or close to it. I find the sheets are easier for the kids because there is a grid pattern printed on the back of the sheet. With one sheet you should get 20 squares. If you want the rose fuller you can cut more squares if you'd like. If you are using the roll it may be easier to cut as you go since the tape can be so sticky.
You will also need to cut a small piece to cover the top of the pen. I had a strip that was approx 3/4 in wide so I just cut a piece of that.
Place that over the top of your pen and smooth it down on the sides.
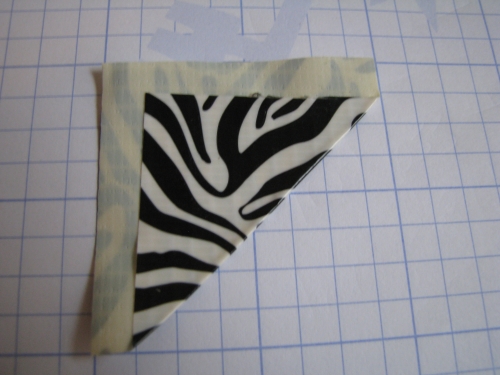
Take one of your 2x2 squares. Fold one corner diagonally across the square piece of tape. Leaving about a 1/4 inch of tape at two edges.
Now take another corner and fold it across again. This time leaving the edge on one side only.
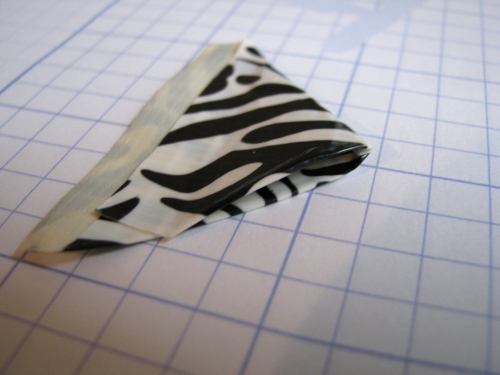
Take your triangle and attach one end to the top/side of your pen. Spin the pen to wrap that tape edge around it.
Repeat that step again making sure to stager them along the way.
Continue adding petals until your rose is as full as you'd prefer.
Now we are going to make a base for the stem. (I didn't have green duck tape so I am using 1 inch vinyl tape instead) Cut a couple pieces approx. 3 inches long with angled ends
Wrap that around the base of the flower as well as part of the pen.
Repeat that step again.
Now you can wrap the tape the way I did here, spiraling down the pen. Or you can cut a piece of duck tape the length of the pen. Attach it to one side all the way own the pen and then roll it on that way.
There you have it! Your very own Ducktape Rose Pen! If you replaces the pen with a chop stick it'd make a cute hair stick!