Tuesday, September 28, 2010

Monster Eye Hair Clip


With Halloween coming my daughter is a tad excited. She asked me to make her some Halloween hair clips. So I made a monster eye clip. But after making I realized with a couple changes I could make it look like a pumpkin too. But I don't have the right color ribbon to make those yet. 
Supplies:
Hot glue gun
2-3 different color ribbon (5/8 or 5/16) 
Alligator clip(s)
2 Small buttons (smaller then 1")
Ruler
Scissors
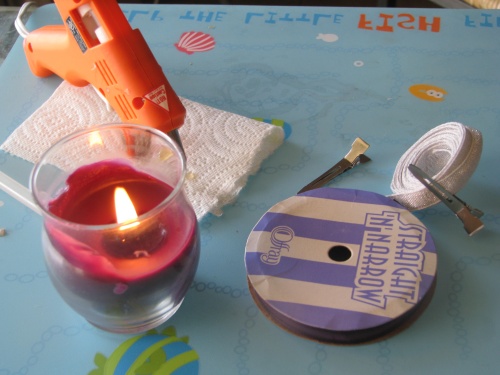
Ribbon lengths:
Clip cover -1- 3"
Whites of the eyes -2- 5 1/4"
Outer eye -2- 5"

I suggest cutting all your ribbon lengths and heat sealing the ends first. This makes sure your ribbon wont unravel. There are a few ways to do this. They sell some stuff that is called Fray Check that is sort of like a glue for the ends of the ribbon. You can use a wood burning tool to cut and seal the ribbon at the same time. Or you can use a lighter or a candle to seal them. I used the candle technique. Hold the ribbon close enough to the flame that the heat melts the ribbon a tad. But not too close, otherwise you could scorch or light the ribbon on fire.


Now we are going to cover the alligator clip in ribbon first. You will need 1 piece of ribbon cut to 3" and 1 alligator clip.

Squeeze the clip open. Put a dab of glue onto the underside of the top half and place the end of the ribbon over the glue.
Next carefully put glue along the top half and fold the ribbon over it. Careful not to get too much glue into the hole in the center. It will end up getting onto the bottom half like I did. Then you have to scrape some glue off LOL But if you do don't worry. you can use a hair dryer to melt away any little strings of glue left after you scrap some off.
Put a dab of glue on the bottom, right where your thumb would pinch to open the clip. Wrap the ribbon around and glue it down.
Your covered clip should look like this.

 Now lets make the monster eyes... Start with one of the 5 1/4" pieces of ribbon. Wrap it around your index finger making a circle.
 Glue the ribbon to it's self making the small circle.
 Wrap the ribbon around it's self making a larger circle around the smaller one.
Glue the end of the ribbon to about the same spot that you glues the smaller circle at.
 Repeat this to make the second eye.

Using one of these double circles. Glue one of your 5" ribbon tips to the same spot. Wrap it around and glue the other end down as well.

 Repeat on the second eye.

You will end up with two pieces that look like this.
  Glue the two pieces together in the center.
 Carefully put a drop of glue inside the smallest circle and attach one of the buttons. Let that cool then repeat for the other eye.

 Next flip the eyes over. In the center put a dab of glue and attach the eyes to the clip. I marked the area with a green dot.

There you go! A cute Halloween inspired clip!

Tuesday, August 31, 2010

Cake Pin Cushions

I found these on The DIY Dish and they are so cute and super easy! Perfect for last minute gifts!!


Supplies:

4 sheets of 9x12 felt. Cut into: 8- 2 1/2 x 12 and 4 1 1/2 x 12

Glue gun and glue sticks

1 magnet (either a disc magnet or sheet magnet cut into a small circle)

Any embellishment... Buttons, ribbon, ric rac, ribbon flowers, beads, etc.

Start with your 8 pieces of felt that you precut to 2 1/2 x 12. Lay two pieces one on top of the other and begin to roll them up. When you have about two inches left at the end lay another one on top and continue to roll, repeat this until you have rolled all 8 pieces together.

Take your hot glue and glue the end down.
Repeat these steps with your 1 1/2 x 12 strips.
You should now have the two layers of your cake.
Next embellish as you wish.
Once you are done embellishing you will have an adorably unique pin cushion!
Now were you wondering what that magnet on the top layer was for?

Easy right? How many are you going to make?

I am sure you could make these a little differently and let your little ones play with them as felt play food ;) 
But this one is definitely going on my sewing table!

Tuesday, August 24, 2010

Slouch neck halter

I am enjoying t-shit recons today! After watching this video on Generation-T I had to try it out. I love this little top. I think I will be making myself a few of these! I think I will make them a little longer. I'll still do 3 inches at the top and 7 at the bottom. But I think I will measure longer then 24 inches to give it a little more length.

Upcycled T-shirt

I have been a fan of Generation-T for a while now. I love all the ideas of things you can do with a t-shirt. I have used some of my old baby doll style t-shirts to make my daughters new clothes. But I have never made myself something from a t-shirt. I have had a Goonies shirt for a while now. But I hardly ever wear it. I love the shirt though so I decided to make something that I would likely wear more often. So I made a halter dress. I didn't follow any real pattern. It was some trial and error with inspiration from Generation-T, but I think it came out great. It's a comfy little dress that is perfect for the AZ summer! What do you think?


What have you made out of a T-shirt?

Monday, August 23, 2010

Pillowcases!

I have seen recently that sewing pillowcases has become very popular. Then last week on The Crafting Pot I read about a great cause, 1 Million Pillowcase Challenge. American Patchwork & Quilting has set a challenge for sewers to help reach the goal of donating 1 million pillowcases to local charities through out 2010. I am sure we (well most crafters anyway) have a stack, box, cupboard, etc of fabrics we just haven't found the right project for. Well, here's your chance! Whip up a few pillowcases and donate them to a local charity!

If the thought of making pillowcases has ever had you a bit nervous, by following a photo tutorial (I admit it, I was) The girls at The Crafting Pot also found a wonderful video tutorial. I personally love video tuts, because I know I am following the steps correctly.

Anyway stop on by The Crafting Pot through out the month of Sept. for some great challenges!

Thursday, August 5, 2010

T-Shirt revamp

While shopping today I found some cute outfits for my daughters. But I wanted to give them a little more umpf.
I started with this top. It is a girls xs which is a girls size 4/5. My youngest is in 18m/2t, but I loved the top. I figured with a little altering it'd make a cute dress.

So I sewed elastic onto both sides. The elastic bunched up the sides a bit and shortened the top.

I then used some ribbon and made a flower pin.

Since I was already playing with the ribbon I also made a couple hair clips to match.

I LOVE how it turned out! I can't wait to get her in it. But since it is after her bedtime I guess I'll have to wait LOL

I also got my oldest a basic black t-shirt.

I used Tulle and fabric to make a flower pin.

I love how it looks with her new skirt!

And again I made a matching hair clip ;)

Here are some blogs with some great flower tutorials!
http://www.thebridescafe.com/?postID=892&diy-t-shirt-flower-wedding-bouquet

http://boutiquenutmegdesigns.blogspot.com/2008/07/fabric-flower-tutorial.html

http://maizehutton.blogspot.com/2007/08/frayed-flower.html